
I always go ALL OUT for the month of February. You might be asking yourself, "Why February? Dr. Seuss's birthday is March 2nd." Well, I have my class go ALL OUT right along with me. We do so many fun and educational activities all month long, and then I post them out in the hallway's big long bulletin board. Here's an example from a few years ago. I've since updated the looks of a lot of the papers (that's really for my own pleasure...it makes me happier when my kiddos are working on papers with cute borders and graphics...haha!)
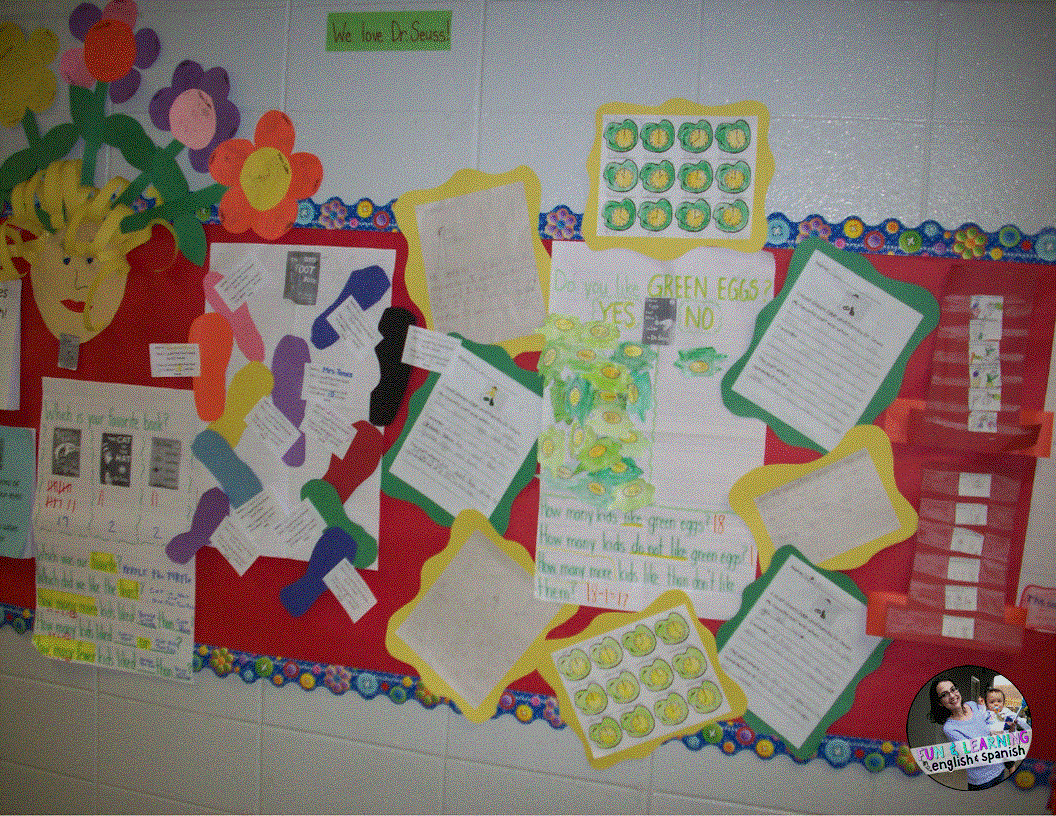
I'll just go ahead and jump right into all of the activities that we do to get ready to celebrate Dr. Seuss's birthday. The books and educational skills are listed for each activity. I hope you get some great ideas! Scroll to the bottom to download this 22 page packet for FREE!
Daisy Head Mayzie - main idea and details
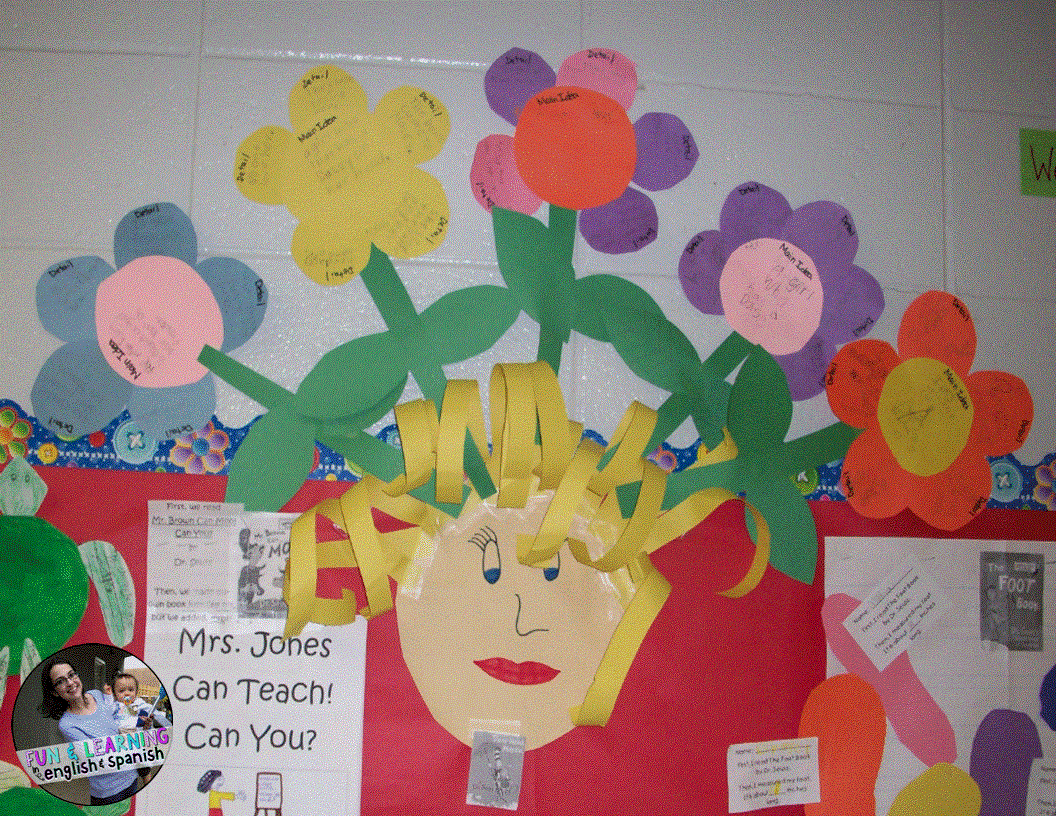
First we read the book Daisy-Head Mayzie by Dr. Seuss. It's not quite as popular as many of his other books, but I don't quite know why. I love it, and so do the kids! After you read it, discuss the main idea and details of the book with the class. You can do it whole group or have the kids turn and talk to a buddy. Last, we make a class craftivity. I made the most beautiful Mayzie head that you see above (hahaha, riiiiiight) out of construction paper. I made her hair curly by cutting out long strips and twisting them around pencils. The kids meanwhile make their own large MAIN IDEA & DETAILS flowers that will "grow" out of Mayzie's head. If you look closely at the picture, you can see that I had pre-made large colored circles and wrote "main idea" in black marker. I also made smaller colored circles and wrote "detail" in black marker. The kids each chose their own colors and then wrote the main idea and details on their own flowers. They then just added a stem and 2 leaves. And voila! You have your very own class Daisy-Head Mayzie!
The Cat in the Hat - sequencing main events
First we read the book The Cat in the Hat by Dr. Seuss. You can choose to discuss rhyming words while reading the book or not; that's up to you. After you finish reading the book to the class, discuss the main events that occurred. I've made 2 different sheets that your kids can work on to practice sequencing main events. For the one below, you will need 1 sentence strip and 1 sheet per student. The kids will read the events, draw a picture to match each event, and then cut/glue the main events in the correct sequential order onto their sentence strip. Scroll to the bottom to download this FREEBIE!

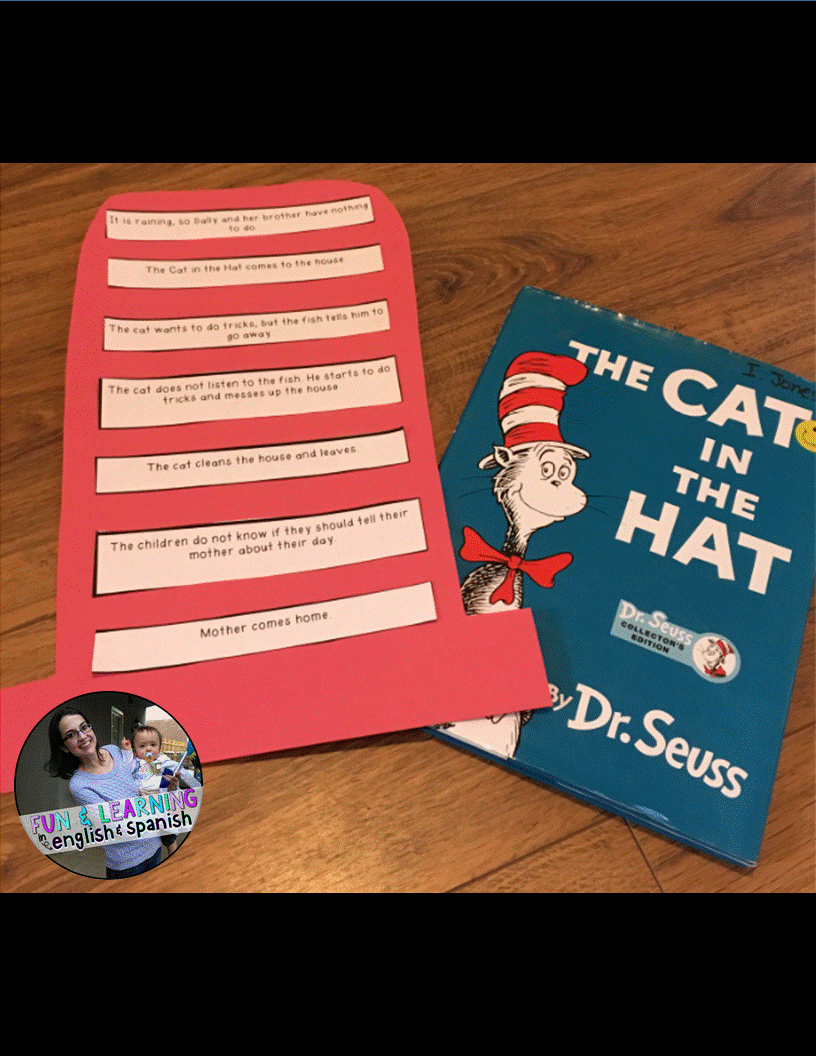
Personally, this next one is my favorite way to have the kids sequence order of events. You will need a large red construction paper and the following sheet. You can have the kids cut out a big red hat on their own, but quite honestly...sometimes they don't cut the hat wide enough for the sequencing strips to fit...so I usually pre-cut the hat myself.

Next, the kids will read each event that's on the sheet. They will arrange them in order BEFORE they glue them onto the hat. Why before? I've learned this the hard way. Once students glue them onto the hat, sometimes they need to rearrange them or space them out better. They can't do that if the strips are already glued.

Then I go around and check to make sure everyone's got the sequencing correct and that they're spaced out semi-evenly (yep, you'll get 1 or 2 kids that won't space them out and it'll look wonky on their final hat). Once that's done, I give the kids the go-ahead to glue them onto their hats.

And voila! So cute AND educational:) In years past, I've chosen to glue/staple the bottom of the hat to a long sentence strip and then staple that together to make the kids their very own hats. Scroll to the bottom to download this FREEBIE!

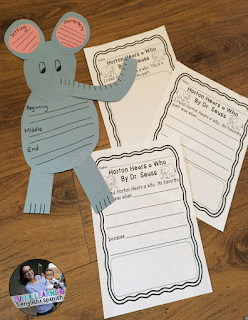
Horton Hears a Who - main characters/setting/beginning/middle/end

Read the book Horton Hears a Who by Dr. Seuss. Discuss the main characters, setting, and plot. Be sure to discuss the beginning, middle, and end of the book as well. I like to make a large anchor chart with the kids right after we read the book. See my example in the picture above. The left ear is for the "setting." The right ear is for the "main characters." The elephant's body is for the "beginning, middle, and end." After we make the large anchor chart, I send the kids off to make their own miniature Hortons. How cute did they turn out?!
Horton Hears a Who - DIFFERENTIATED reading responses
Read the book Horton Hears a Who by Dr. Seuss. Have the kids turn and talk with a partner what their favorite part was and why. I made 3 differentiated reading response sheets.
My lower level readers and writers will use this one. They only have to draw their favorite part.

My middle level readers and writers will use this one. They have to write their favorite part and then illustrate it.

My higher level readers and writers will use this one. They have to write their favorite part and WHY it was their favorite part. Then they illustrate it. Click on any of the pictures for more info!

Horton Hears a Who - compare/contrast book & movie (and science: sounds)
Read the book Horton Hears a Who by Dr. Seuss. Then watch the animated movie. WHILE you're watching the movie, stop at various intervals to let the kids turn and talk with a partner. They fill out the sheet DURING the movie. Why during? Because they're young kiddos. They won't remember a lot of the details of the movie. Also, you want to make watching the movie an educational experience:) Scroll to the bottom to download this FREEBIE!

Mr. Brown Can Moo! Can You? - verbs

Read the book Mr. Brown Can You! Can You? by Dr. Seuss. Review what verbs are (action words, things that you can do). Then make this fun class book to display outside on your hallway bulletin board! I made this cute sign so that passersby in the hallway would know what we did:

Here is an example of the class book's cover:

Here is an example of a student page.
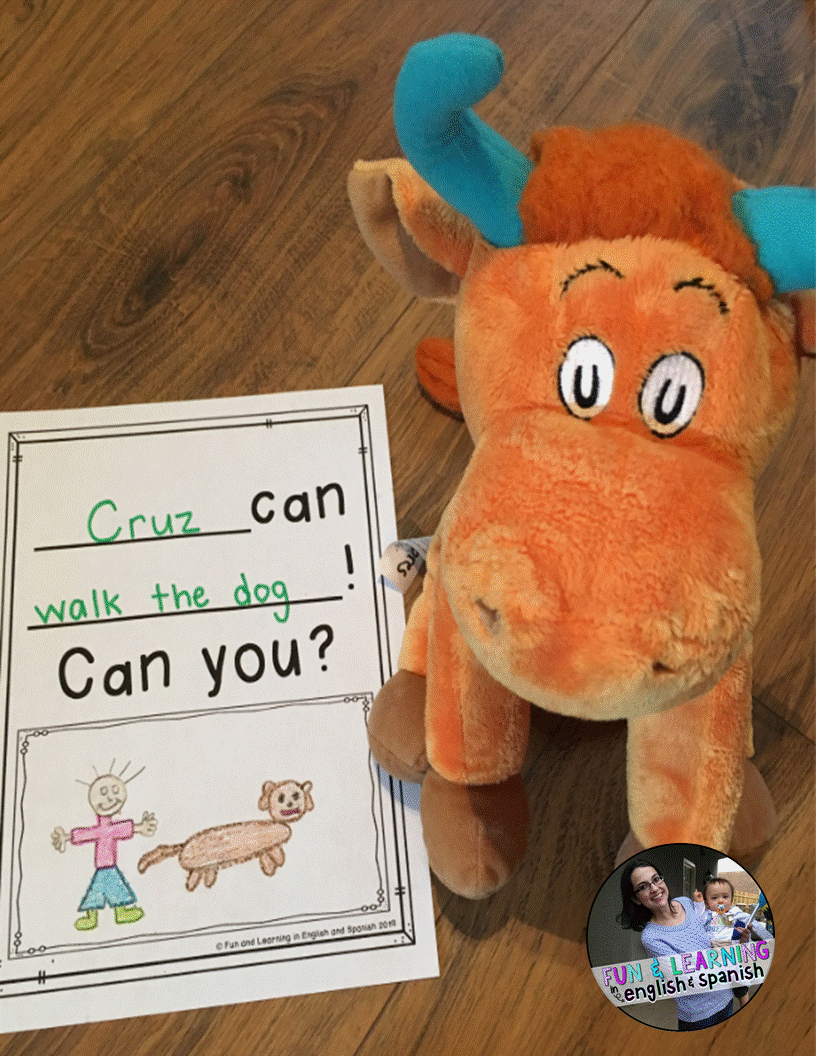
You only need to print 1 explanation sheet for the bulletin board, 1 class cover, and 1 student sheet PER STUDENT. Scroll to the bottom to download this FREEBIE!
Green Eggs & Ham - graphing

Read the book Green Eggs & Ham. Have the kids make predictions about whether or not they like green eggs & ham. I like to ACTUALLY MAKE GREEN EGGS in the classroom while the kids watch. They love it! At your teacher table (or another safe spot away from the kids), heat up a griddle. Add some green food coloring to scrambled eggs and put them aside. When the griddle is nice and warm, invite a few kids over to watch you cook the green eggs (I don't usually let them see me adding the green food coloring...it add a little suspense...haha) Give each of them a tiny bit of green egg to taste. Then send them back to their seats to work on the writing activity (listed below). Rotate through so that each student is able to see you cook the eggs and taste them. Then make a class graph like the one pictured above. Print out enough of eggs so that you have 1 egg per student.

After your kids have colored their eggs green and glued them onto the class graph, be sure to discuss it. Ask some questions. How many more kids like ____ than ____? How many less? Etc. Scroll to the bottom to download this FREEBIE!
Green Eggs & Ham - reading response & making connections
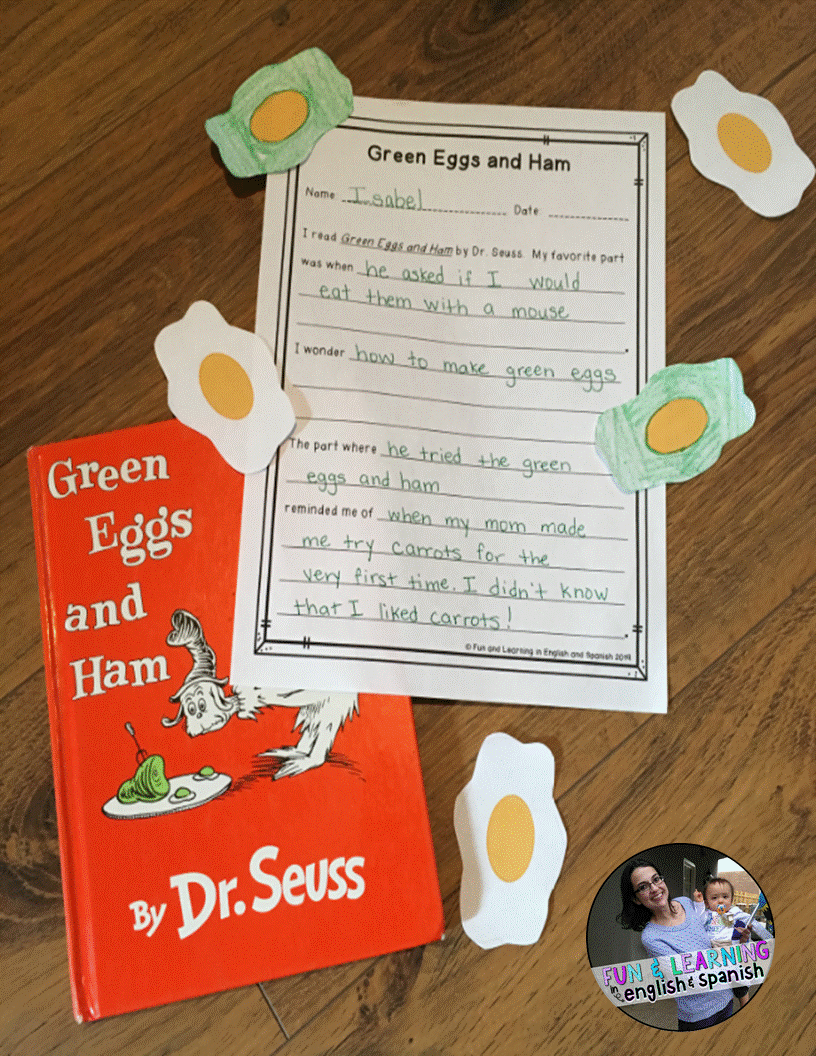
After you read the book Green Eggs and Ham by Dr. Seuss, discuss your opinions of the book. Have the kids practice making connections with the book as well. For example, the part where he finally tried the green eggs reminded me of the time that my mom made me eat radishes and I didn't want to. Scroll to the bottom to download this FREEBIE!

The Foot Book - measurement

Read The Foot Book by Dr. Seuss. Discuss the book and what happened throughout it. Afterwards, give each student a sheet of construction paper. They can trace their own SHOE outline, or they can have a buddy trace it for them. Why did I write "shoe" in capital letters? Because I made the mistake one year of letting the kids measure their actual foot (without a shoe) and let me tell you, those little feet stink! Bad! Really bad! Haha. So yeah, have the kids keep their shoes on:) After they trace their shoe on the paper, kids can cut out their shoe outline.

Then give each of the students one of the following papers. This sheet has the students use connecting cubes or unifix cubes to measure the length of their foot.

This sheet gives the students the option of using whatever manipulative they want. They can write the unit of measurement that they chose to use (counting bears, paperclips, inches, centimeters, etc.)

Click on any of the pictures for more info!

Yertle the Turtle - main characters, setting, problem, solution

Read the book Yertle the Turtle by Dr. Seuss. This is another book that is not very popular, but it should be! It's a little longer of a story, but it always keeps my kids' attention the whole way through. After you read the book, discuss who the main characters are, what the setting was, what the main problem was, and what the solution was in the book. I made a large anchor chart and had the kids help me fill it out. It turned out pretty cute, don't ya think?
After we make our class anchor chart, I have the kids make their own craftivity. Each student uses green paint to paint a large paper plate. This will be the turtle's body. (If you don't want to use paint, a large green construction paper circle will work just fine!) Each student will write the main characters and setting on the turtle's arms.

Then they write the problem and solution on the turtle's legs.

When they finish writing, they can begin coloring the head and tail.
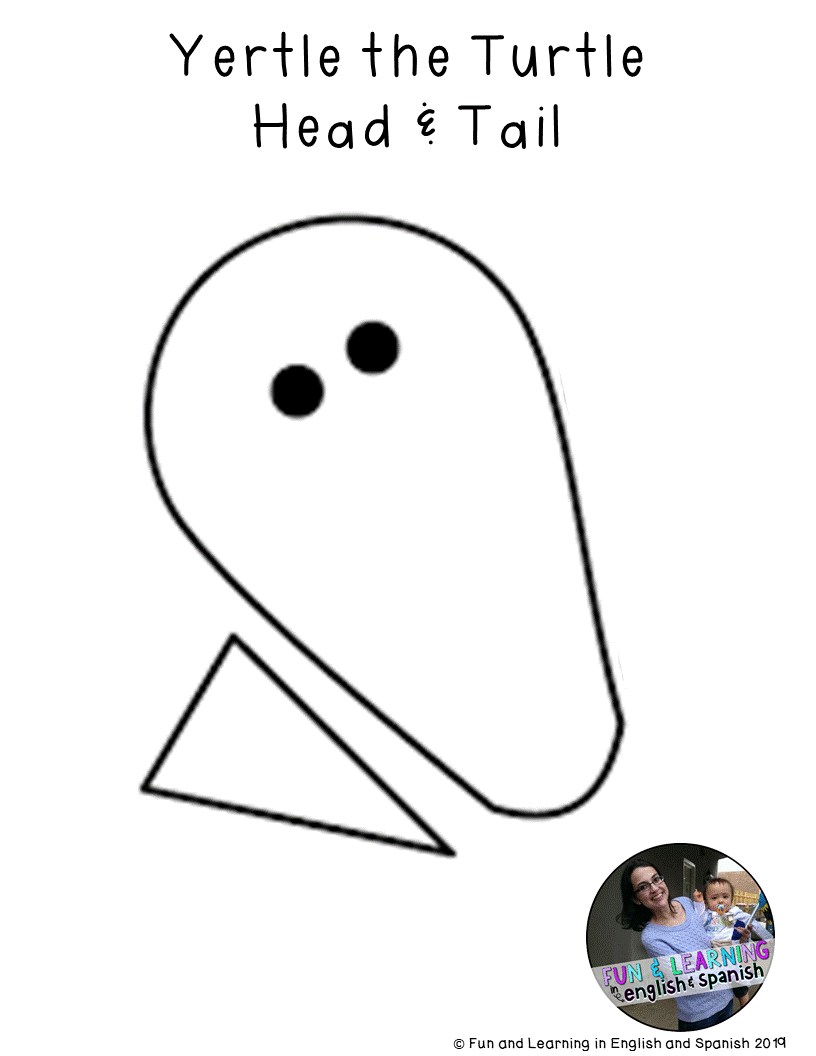
Finally, allow the kids to color AROUND their writing or COLOR LIGHTLY ON TOP of their writing. You want to be sure that you can still read what they wrote under their green coloring. Then they can glue the turtle together (or you can choose to staple the pieces to each green paper plate.) Scroll to the bottom to download this FREEBIE!

Yertle the Turtle - compare & contrast similarities and differences

Read the book Yertle the Turtle by Dr. Seuss. As a class discuss some similarities and differences between Mack and Yertle. Then have the kids complete the following sheet. Click on any of the pictures for more info!

All of Dr. Seuss's books - opinion writing

After reading many of Dr. Seuss's books, you can choose to have the kids practice opinion writing. Remind them that when they are writing an opinion, they need to state their opinion, list 3 reasons for their opinion, and then write a closing statement (repeat their opinion). The sheet above simply asks the students what their favorite book was. The sheet below is for them to fill out IMMEDIATELY AFTER YOU READ A DR. SEUSS BOOK. For this one, they will insert the title of the book and write their opinion about it. Scroll to the bottom to download this FREEBIE!

All of Dr. Seuss's books - graphing & using tally marks

For this, I printed little pictures of the covers of Dr. Seuss books and glued them onto a large chart paper. The kids each wrote a tally mark to indicate which book was their favorite. Then I wrote questions at the bottom. As you can see in the picture above, I highlighted KEY WORDS that the students could use as clues to figure out what the question was asking. As a class, we discussed the questions, figured out the answers, and then the kids wrote the answers on the chart paper.
On a separate day, I also made the graph below. The kids each colored a fish and glued it next to their favorite Dr. Seuss book on a large chart paper. After everyone has finished gluing their fish to the chart, we come together as a class and write questions that passersby (in the hallway) can answer. The kids LOVE this activity. They're so used to having to answer questions about graphs. The thought of having to ask questions about a graph is oftentimes new to them. You can do this whole group or you can have the kids pair up with a buddy. In the picture below, you can see the awesome questions that the kids came up with on their own! I'm so proud of them!

You will need to print enough fish so that every student gets one. I usually print a few extra because some kids accidentally cut off the fish's tails or fins sometimes. Those little hands aren't used to cutting in such detail, ya know? Scroll to the bottom to download this FREEBIE!

And there ya have it, a whole month of Dr. Seuss activities! I hope you found some of this to be useful. Click on the picture below to download your 22 PAGE FREEBIE!

Bye for now😃
No comments:
Post a Comment